付费的知识星球要过期了,python 教你怎么办
前面讲过 python 爬虫的常用技巧,今天补上一篇实战指南,爬取知识星球里某个星球的所有数据,对,你没有听错,是所有数据,包括了内容、问答、评论、图片、文件、甚至是谁点了赞!心动了吧,赶快行动吧。
当然,本篇文章需要你有一点 python 基础,如果没有的话,建议你先收藏,去找一些教程学习一下这门工具人语言。
好了,废话不多说,马上开始。
首先,导入所需要的包:
import queue
import time
import threading
import requests
import pymongo
import logging
import os

# 配置用于日志打印的 logger,纯属个人爱好,你可以用 print 代替
logging.basicConfig(level=logging.INFO)
logger = logging.getLogger()
准备数据库
把获取的数据存入 MongoDB 中,为什么选择 MongoDB?因为非关系型数据库比较简单,我们用到的数据结构也不复杂,开发起来比较快。
if __NAME__ == '__MAIN__':
    try:
        # 打开数据库连接
        logger.info('Connecting to MongoDB...')
        client = pymongo.MongoClient(MONGODB_URI)
        logger.info('Successfully connected!')

        # 在此进行爬虫逻辑

        # 关闭数据库连接
        logger.info('Closing MongoDB...')
        client.close()
        logger.info('Successfully closed!')
    except Exception as e:
        logger.error(e)
分析知识星球的网络请求数据
用 Chrome 浏览器的开发者工具对知识星球 PC 端的网络请求进行观察,发现获取星球话题的请求只有一个,我们把它赋值给 BASE_URL。同时发现登录的 token 就在 cookie 里面: zsxq_access_token,啧啧,太明显了。
GROUP = '15281148525182' # 星球id
BASE_URL = 'https://api.zsxq.com/v1.10/groups/{}/topics'.format(GROUP)

# 构造全局请求头
headers = {
    'cookie': '换成你的 Cookie',
    'user-agent': 'Mozilla/5.0 (Macintosh; Intel Mac OS X 10_15_5) AppleWebKit/537.36 (KHTML, like Gecko) Chrome/86.0.4240.198 Safari/537.36'
}
分析话题数据,可以归纳总结出以下结论:
- 话题类型有两种:
talk是普通话题,只有 1 条内容,q&a是问答,问答含有提问和回答 2 条内容。 - 所有内容均可能包含图片或者文件(不太确定问答的内容是否会包含文件,因此当作可能包含文件处理)。
- 当请求返回的话题数量为 0 时,说明已经爬取完毕。
我的 CPU 有 4 个核心,考虑到文本、图片、文件出现的频次和下载时间,多线程设计如下:
- 设计 3 个队列:
topic_q、images_q、files_q,分别存取end_time、图片信息、文件信息,分别用于获取话题信息、下载图片、下载文件。 - 设计 4 个线程,1 个获取话题信息,2 个下载图片,1个下载文件。
- 当所有队列结束时,程序结束。
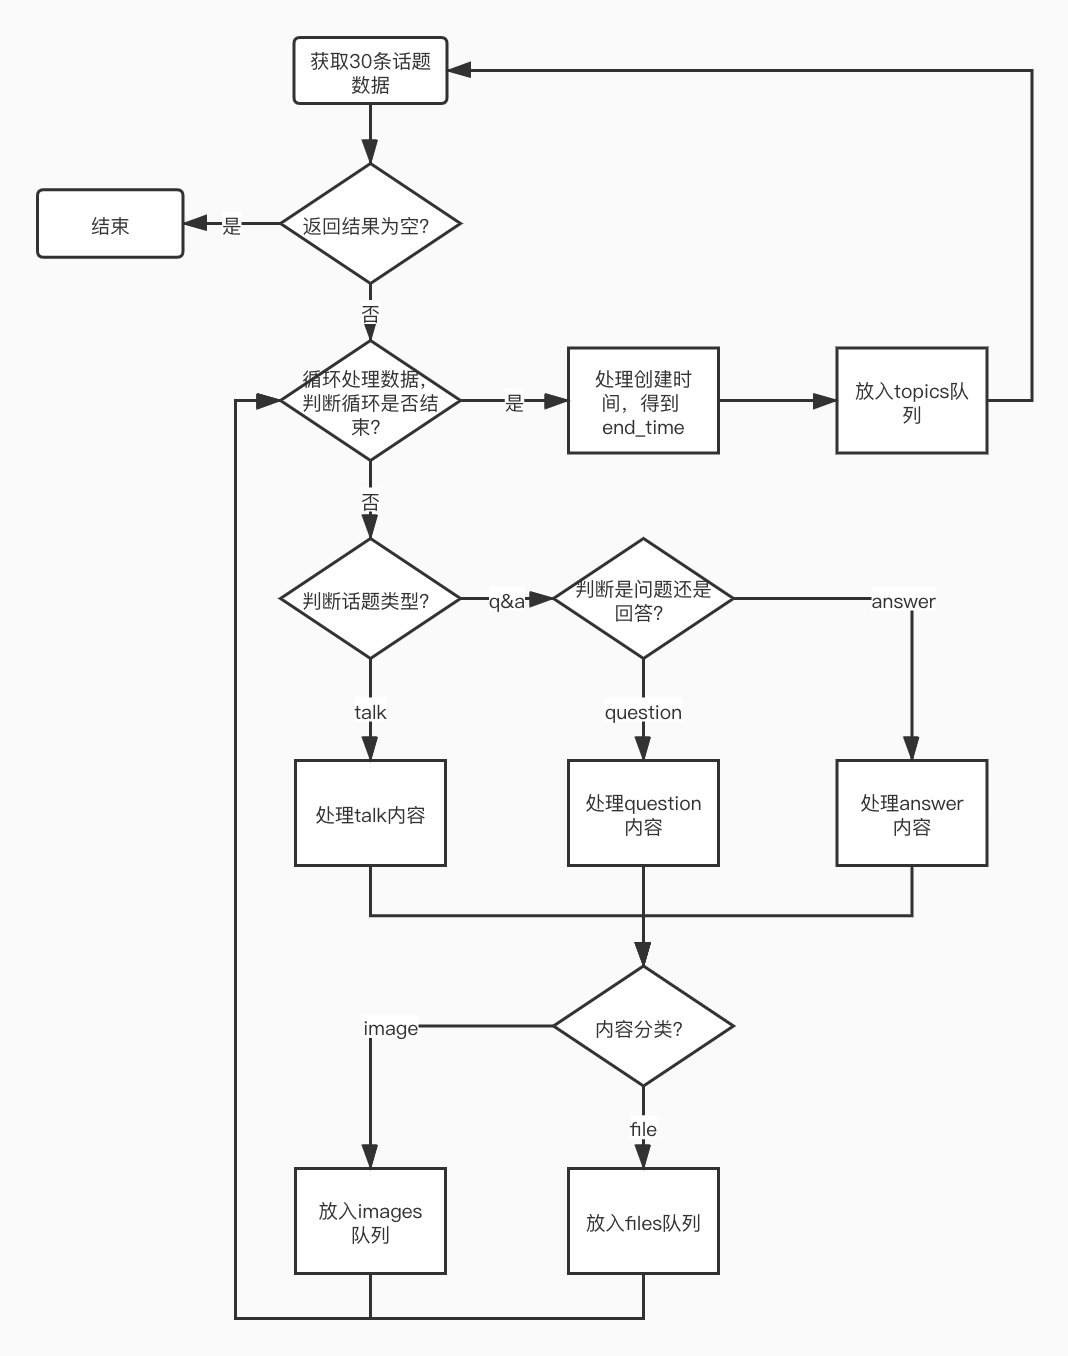
流程图
为了能让你更好地理解,我画了一副流程图,可以配合流程图来理解代码,事半功倍。
多线程并行
根据上面的分析,创建 3 个队列,4 个线程,并把下面的代码放到连接、关闭数据库代码的中间:
# 任务队列
topic_q = queue.Queue()
image_q = queue.Queue()
file_q = queue.Queue()

# 开启获取 topics 的线程
t = threading.Thread(target=get_topics_thread)
t.setDaemon(True)
t.start()

# 开启获取 images 的线程
t = threading.Thread(target=get_images_thread)
t.setDaemon(True)
t.start()
# 再开启一个获取 images 的线程
t = threading.Thread(target=get_images_thread)
t.setDaemon(True)
t.start()

# 开启获取 files 的线程
t = threading.Thread(target=get_files_thread)
t.setDaemon(True)
t.start()

# 把第一个任务添加进队列
topic_q.put(None)

# 等待任务队列结束
topic_q.join()
image_q.join()
file_q.join()下面是各个线程函数,作用是不断的从对应任务队列中取出参数并执行处理方法,fetch_topics、fetch_images、fetch_files 分别是下载对应内容的方法。
# 话题线程
def get_topics_thread():
    while True:
        job = topic_q.get()
        fetch_topics(job)
        # time.sleep(1)
        topic_q.task_done()

# 图片线程
def get_images_thread():
    while True:
        job = image_q.get()
        fetch_images(job)
        # time.sleep(1)
        image_q.task_done()

# 文件线程
def get_files_thread():
    while True:
        job = file_q.get()
        fetch_files(job)
        # time.sleep(1)
        file_q.task_done()
下载话题数据
创建 fetch_topics 方法,用来发送获取星球话题的请求,上面已经设置好了 BASE_URL,这里设置请求参数即可。
观察发现,API 的参数有 3 个,分别是:
scope:话题范围,例如:精华话题还是图片话题。all代表全部话题。count:返回的话题数量,网站里默认 20 个,但经测试,30 个也能正常返回,40个以上报错。end_time:关键参数,知识星球通过它来分页,不填则返回最新的count个话题,比如 20,如果你想得到第 21 - 40 个话题,那么就需要设置end_time为第 20 条话题的创建时间,并且要把创建时间的毫秒数减 1。
# 调用一次该方法,就请求一次 API,根据 end_time 参数的值来控制返回的话题
def fetch_topics(end_time=None):
    # 设置参数为全部话题,返回话题数量为 30 个
    params = {
        'scope': 'all',
        'count': '30',
    }
    if end_time != None:
        params['end_time'] = end_time

    # 发送请求
    r = requests.get(BASE_URL, headers=headers, params=params, allow_redirects=False)

    # 打印请求地址,用来 debug
    print(r.url)

    d = r.json()
    # 异常处理,如果服务器返回错误,则等候 15 秒,把 end_time 压入话题队列
    if d['succeeded'] == False:
        logger.error('get topics error, url: {}, params: {}'.format(BASE_URL, params))
        time.sleep(15)
        topic_q.put(end_time)
        return

    # 返回的话题数量为 0,说明已经爬取完毕,直接结束方法
    if len(d['resp_data']['topics']) == 0:
        logger.info('Fetch topics done!')
        return 'done'

    # 到这里说明一切正常,把得到的话题数据全部存入 MongoDB
    try:
        db = client['zsxq']
        collection = db['topics_{}'.format(GROUP)]

        insertItems = [{ 'raw_data': topic, 'topic_id': topic['topic_id'] } for topic in d['resp_data']['topics']]
        insertResult = collection.insert_many(insertItems, ordered=True)
        logger.info(str(len(insertResult.inserted_ids)) + ' documents were inserted')
    except Exception as e:
        logger.error('Insert to mongodb error, related page {}'.format(r.url))
        logger.error(e)

    # 循环处理每一条话题数据,get_images 和 get_files 为把图片和文件的信息分别压入图片队列和文件队列
    for topic in d['resp_data']['topics']:

        # 类型为 talk
        if topic['type'] == 'talk':
            if 'talk' in topic:
                get_images(topic['talk'])
                get_files(topic['talk'])
        # 类型为 q&a
        elif topic['type'] == 'q&a':
            if 'question' in topic:
                get_images(topic['question'])
                get_files(topic['question'])
            if 'answer' in topic:
                get_images(topic['answer'])
                get_files(topic['answer'])
        else:
            # debug 专用,因为不确定是否含有除 talk 和 q&a 以外的话题,如果有,则打印出来,方便处理
            print(topic)

    # 到这里,说明得到的话题都处理过了,下面就要处理 end_time,然后把 end_time 压入话题队列
    end_time = d['resp_data']['topics'][len(d['resp_data']['topics']) - 1]['create_time']
    tmp = str(int(end_time[20:23]) - 1)
    while len(tmp) < 3:
        tmp = '0' + tmp
    end_time = end_time.replace('.' + end_time[20:23] + '+', '.' + tmp + '+')

    topic_q.put(end_time)
下载图片
图片可能包含三种类型:thumbnail 缩略图、large 大图、original 原图,不一定全都有,因此在下载前要判断。
def fetch_images(img_info):
    # 下载图片函数
    def download(url, image_id, type, subfix):
        # 设置目标文件位置
        target_dir = './images/{}/{}.{}'.format(image_id, type, subfix)
        # 文件夹不存在的话,则创建文件夹
        if not os.path.exists(os.path.dirname(target_dir)):
            try:
                os.makedirs(os.path.dirname(target_dir))
            except Exception as e:
                logger.error(e)

        # 下载
        with open(target_dir, "wb+") as file:
            response = requests.get(url)
            file.write(response.content)

        # 下面把图片保存的位置存在 MongoDB 中,和原文的 id 和类型对应。
        try:
            db = client['zsxq']
            collection = db['images_{}'.format(GROUP)]

            insertItem = {
                'symbol': '{}_{}'.format(image_id, type),
                'image_id': image_id,
                'type': type,
                'url': 'url',
                'target_dir': target_dir
            }
            result = collection.insert_one(insertItem)
            logger.info('1 document was inserted into images_{} collection with the _id: {}'.format(GROUP, result.inserted_id))
        except Exception as e:
            logger.error('download image failed, image_id: {}, type: {}'.format(image_id, type))
            logger.error(e)

    # 下面处理不同类型的图片,并调用上面的下载方法
    if 'thumbnail' in img_info:
        download(img_info['thumbnail']['url'], img_info['image_id'], 'thumbnail', img_info['type'])

    if 'large' in img_info:
        download(img_info['thumbnail']['url'], img_info['image_id'], 'large', img_info['type'])

    if 'original' in img_info:
        download(img_info['thumbnail']['url'], img_info['image_id'], 'original', img_info['type'])

    # 由于图片下载比较慢,每下载一组打印一次剩余图片数量,让自己知道当前进度
    print('Remain: {}'.format(image_q.qsize()))

    pass
下载文件
知识星球 PC 端是无法下载文件的,我用手机抓包后才得到了下载地址:
def fetch_files(file_info):
    # 下载文件函数
    def download(url, filename):
        # 文件夹不存在的话,则创建文件夹
        if not os.path.exists(os.path.dirname(filename)):
            try:
                os.makedirs(os.path.dirname(filename))
            except Exception as e:
                logger.error(e)

        # 下载
        with open(filename, "wb+") as file:
            response = requests.get(url)
            file.write(response.content)

            # 下面把文件保存的位置存在 MongoDB 中,和原文的 id 对应。
            try:
                db = client['zsxq']
                collection = db['files_{}'.format(GROUP)]

                insertItem = {
                    'file_id': file_info['file_id'],
                    'name': file_info['name'],
                    'target_dir': filename
                }
                result = collection.insert_one(insertItem)
                logger.info('1 document was inserted into files_{} collection with the _id: {}'.format(GROUP, result.inserted_id))
            except Exception as e:
                logger.error('download file failed, file_id: {}, file_name: {}'.format(file_info['file_id'], file_info['name']))
                logger.error(e)

    # 这里就是获取下载地址的 API,在手机上抓包得到的
    url = 'https://api.zsxq.com/v1.10/files/{}/download_url'.format(file_info['file_id'])
    r = requests.get(url, headers=headers)
    d = r.json()
    # 异常处理,打印错误,然后直接结束方法
    if d['succeeded'] != True:
        logger.error('fetch file download information failed, target: {}'.format(file_info))
        return

    # 得到下载地址后,执行下载
    download(d['resp_data']['download_url'], './files/{}/{}'.format(file_info['file_id'], file_info['name']))

    pass
以上就是今天的实战指南。最后是你们最关心的哪里下载源码?老实说,我能给你的最好建议其实是按照上面的例子自己敲一遍,真的很管用,学编程就是要动手。
注:所有代码均基于 python 3.6.5 版本,使用其他版本可能无法运行。
如何下载源码以及更多的编程资源?只需简单 2 步:
- 关注微信公众号:湾区码农
- 回复关键词zsxq即可获得